All about discharge inks – Updated

How can I print light designs on a dark garment – All about discharge inks.

I want to print light on dark?

I want a soft touch?

What is a discharge ink?

Here at Wicked Printing Stuff we don’t expect you to know everything and we are happy to explain things. Have you checked out our FREE buyers guide there is lots in there for the Rookie, Intermediate and Professional. Please give us a ring and explain your problem and we will help out. Lastly there are our training courses, designed again for both rookie and advanced printers with basic training or advanced courses.

So back to the problem. You want to print a light colour on a dark garment and you want it to feel soft. Now plastisol inks wrap colour AROUND the threads but gives a rubbery feel (also referred to as hand) but is bright. So ideally you want a water based ink. For those of you that have tried this and I can hear you shouting at the back, but I have tried waterbased inks and I just can’t get a good opaque print, that’s why I use plastisol. Well that’s where the discharge inks come in!

Punk rockerFor the punk rockers out there, remember how you got that bright green hair, that is right you had to bleach out your own hair colour first so the back ground colour was white, only then the colour would take and be vibrant and striking. It is almost the same in screen printing but we use discharge inks that need curing. The discharge ink actually removes the dye.

First off you have to have the right garment fabric, it has to be 100% cotton and it has to be dyed with a dischargeable dye. So check with the manufacturer. If the garment is a mixture of cotton and polyester only the cotton will discharge. Now that might actually suit you but you would need to do a trial run to make sure you get the effect you want.

Discharge processSo having got the right garment now we need the right ink. There are a lot out there and some are more complicated to use than others.

Water based dischargeable inks are the easiest and most eco friendly ones to use. The process works during curing when the discharge removes the original dye and the ink gives the new colour. To do this you add activator to the ink which ensures you get an intense colour.


Fuji MagnaColours

We have now introduced two Water based Discharge Ink ranges the patented MagnaPrint® Discharge ULF Ultra range of inks which are Formaldehyde Free and Soil Association Approved and Oeko tex class 1 and class 2 approved. This is the only system which does not stipulate that the garment has to be washed prior to wearing and is low odour compared to over discharge systems. The second system is Sericol TexCharge the largest ink manufacturer, TexCharge is Soil Association approved and also includes a colour matching system.

We also offer MagnaPrint Plascharge additive which you mix 50 / 50 with a plastisol ink, so if you are a plastisol printer you can take advantage of discharge technology.

For the discharge process to work, you do need a tunnel dryer (the longer the better) – typically 90-120 seconds dwell time is needed for a good cure. You can also use a heat press which is great for low production. You also need well ventilated premises and printers should read the MSDS and be aware of any health and safety consideration.
We would be delighted to talk you through this if you have any questions, please contact us.

CMYK screen printing explained

What is CMYK?

How do you do this in screen printing?

Is it the same as 4 colour printing?

Think back to school when you were painting and used blue and yellow to get green, that is the theory of the whole process. It is used all over the place and you will see the little symbol on things you use every day!

I don’t want you to rely on pictures too much because your screen or printer will subtly alter these colours. But have a look at this picture from Wiki to get an idea, yes basically it is just like school blue, red and yellow.

Now these colours can be combined to get all the rest of the spectrum

Now as you no doubt remember from school, combining them does give a murky black which is no good for our purposes which is why we have to have black. Saves ink as well.

So that is the inks but how does it work. Well you put the 4 colours onto the substrate (thing you are printing on) in dots and when the dots are on top of each other you get the various colours and your picture.

Now remember the way screen printing works, the ink is pushed through the mesh in dots! The finer the mesh the closer together the dots are so you can’t see the background colour.

Basically your brain has the illusion into thinking you see a solid colour when in fact what you see is lots of dots. All screen printing works on that principle.

The ink is normally applied in that colour order Cyan, Magenta, Yellow, Black although that can vary with some printers.

There is actually a principle behind the process called “subtractive”. Because you are printing on white, you are subtracting, with the inks, the amount of white(brightness) your eye sees. Now if you don’t fill in all the dots you get to see more white and that gives you paler colours, which can also be mixed and matched to get the full range. This bit is called “half tones”.

Honestly the principle is as simple as that, any water colour artist would see it immediately although they may not know what it is called.

So that is the theory, 4 inks printed in dots, here is an early example from 1902

Now how do you do this?

You have to separate your final image artwork into its CMYK elements.

If you check Photoshop all the colours show what percentage of these colours comprise the colour you see.

Photoshop automatically separates the CMYK colors into channels. Just open the channels palette and select “split channels” from the palettes flyout panel options. You will get four grayscale files, one for each channel. So you need 4 screens that have the required separate colours which when combined will give your final picture.
Be aware, however, that this is NOT how you separate artwork for screen printing. If you are printing the job as a 4 color process on white shirts, all you want are printouts of the separate channels, just print the file as “separations” with a course line screen (35 to 55 lpi) and the following angles – C: 55 degrees, M: 22 degrees, Y: 5 degrees, K: 80 degrees. Not doing this right gives you the Moire effect (it looks blurred). Other angles can be used for example.

There are literally nearly 80,000 videos on the internet describing exactly how to do this and I suggest you watch a few, several times until you feel completely confident you understand the process.

In order for all this to work you need a very high mesh count so you get lots of dots which give your brain the illusion correctly. We have kits with all you need to try this, have a look at http://www.wickedprintingstuff.com/inks_and_additives/plastisol_ink_and_additives/union_inks/trutone_range/wps_uniontrutone_process_printing_pack_P1145.html

The Trutone Process Printing Pack Contents are ;-

  • 4 x Aluminium Screens 16 x 20inches 120T
  • 4 x Wooden Squeegees with a Hard Square Cut Blade
  • 1 x PRPL-2080 Process Yellow 250ml
  • 1 x PRPL-3082 Process Magenta 250ml
  • 1 x PRPL-5080 Process Cyan 250ml
  • 1 x PRPL-8080 Process Black 250ml

This pack contains all of the essentials you need to try out the fantastic Trutone process inks at an affordable price. As ever we are completely happy to give you the benefit of our 30 years of experience so please contact us with any questions.

Here is an example of a finished product, the screens were produced using the Riso QS200.

20140909_112710

What is the difference between Serigraphy and Screen Printing?

What is the difference between Serigraphy and Screen Printing?

Actually there isn’t any really, the process is identical, you might almost call it a snob term. Exactly like printing on t-shirts it involves screens and inks however it is often used to refer to fine art rather than garments. Sometimes the results can be limited edition runs, hand printed by the artists and then the design is destroyed. This is one I found on the internet searching on serigraph limited editions.

https://m1.behance.net/rendition/modules/87274333/hd/4b89504589284a64cb2e173bd680a190.png

High Build Stencils – How to guide

How to Create High build stencils

Illustrated Step by Step Guide

Looking to give your designs the edge with a 3D raised look or wanting to add some texture to your designs?  High build stencils are also used extensively when printing circuit boards, applying varnishes to give a raised feel and for applications such as non-slip socks.  Then you will need know how to create a high build stencil.

1 High Build Stencils

You have a couple of options, you can use direct emulsion and build up the coats or you can use a capillary film – which is a sheet already coated with an emulsion.  In this article we are using Chromaline Phat Film which is the quickest and easiest way to create the high build stencil.

Phat Film comes in various sizes giving a stencil depth from 100 – 700 microns,  in this article we are using 200 micron film,  to give you some comparison a 43T mesh screen with a coat on both squeegee and print side will give you stencil depth of around 25 microns.

So to get the same stencil depth as a 200 micron film, that works out that you would need at least 9 – 10 coats of emulsion which needs to be applied when the screen has dried, which equals lots of work and lots of time (over a day to prepare one screen!).  Also to get consistent coats is difficult and there is always a risk that another emulsion coat which be added to a coat which has not completely dried which reduces light sensitively and can lead to premature stencil failure.

2 High Build Stencils

How did we do it?

Step 1

We printed out our film positive as per normal, we are using  an Epson 1500W with Blacquer Ink – it is really important that the artwork is as dark as possible.  Hold your positive up to the light and if you can see the light through the artwork then print 2 copies out and stick them together with invisible tape.  TIP – you can print one of the copies out in Red, which is a colour which blocks UV light.   PHAT film is coated in a Photopolymer emulsion which is fast exposing but you need to be as accurate with exposure timings as much as possible.

3 High Build Stencils

Step 2

Degrease your screen as per normal using a degreaser and power hose.  In this article we are using a 32T screen.  It is best to use low mesh count screens when using high build stencils. Make sure your screen is completely free of grease and dirt.

4 High Build Stencils

Dry the screen.

Step 3

We use a standard dual cure emulsion to laminate the PHAT film onto the mesh.  We performed the steps in sub dued light.
Remove the cover sheet of the PHAT film.

5 High Build Stencils

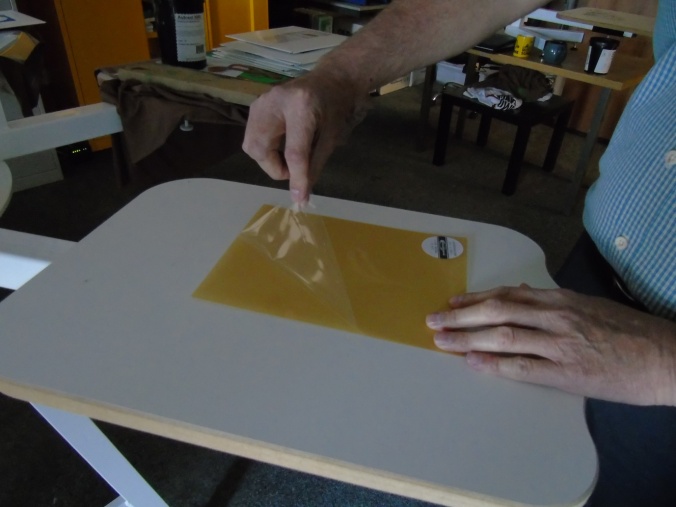
Place the screen print side down onto the PHAT film, we are lucky enough to have a clean platen to rest on otherwise use a table (make sure the surface is clean and free of any dust).

6 High Build Stencils

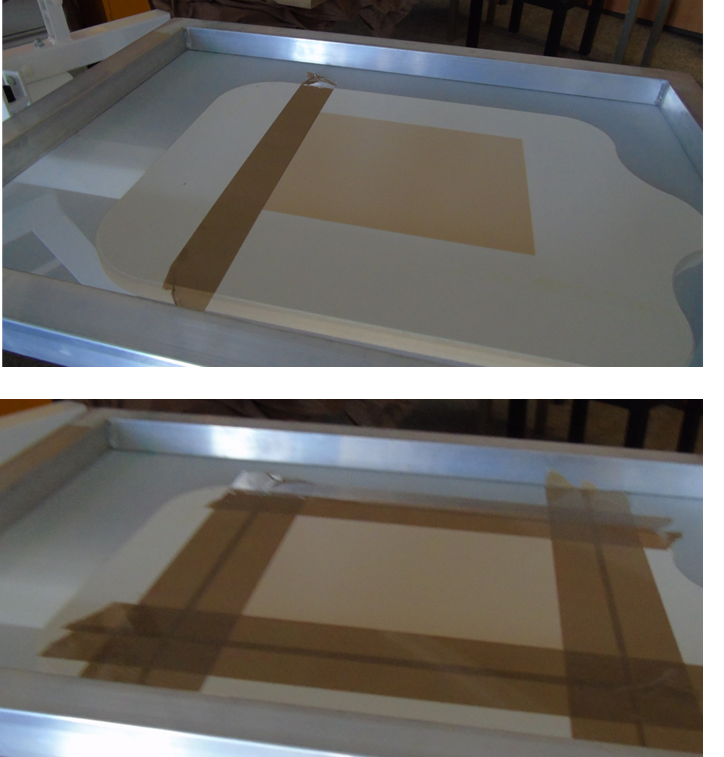
Put some blocking tape squeegee side of the screen around the edges of the film.

7 High Build Stencils


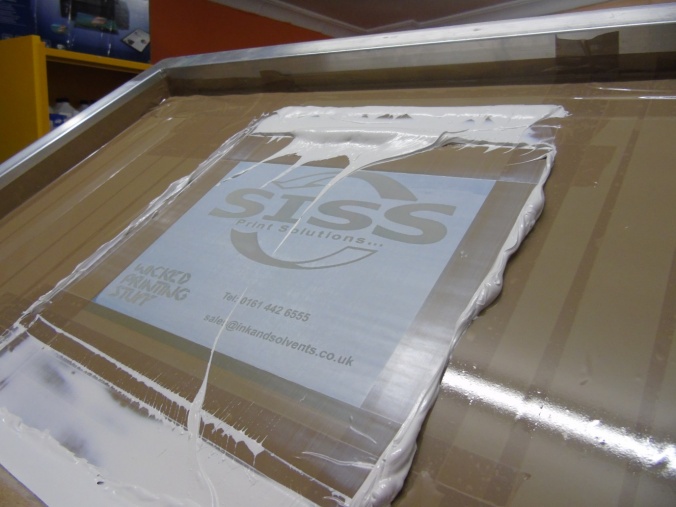
We will need to laminate the PHAT film to the mesh using a dual cure emulsion, you can pretty much use any dual cure emulsion – in this article we are using Macdermid Autosol 5000 which was already sensitised and ready to go.   We poured a ridge of emulsion onto the taped area of the mesh.

9 High Build Stencils

We then used a squeegee (Medium 75 green are perfect for this) to cover the PHAT film. Use the same pressure as if you were flooding the screen.  You will likely have to coat 4 times using the squeegee – if you can hear the squeegee rub on the mesh it means you need more coats of emulsion.

10 High Build Stencils

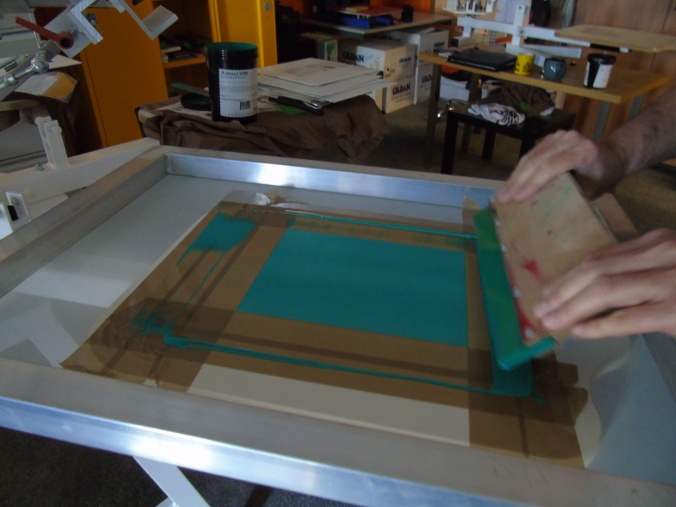
Put any excess emulsion back in the pot.

11 High Build Stencils
Put the screen in your drying cabinet.  Make sure the emulsion is completely dry before moving to the next step.

Peel off the thicker release sheet (if the release sheet puts up some resistance then leave the screen to dry for a little longer) then try again.  After you have removed the sheet then put the screen back in the drying cabinet for 5 mins or so.

12 High Build Stencils

Step 4

Exposing the artwork
Align the film positive to the PHAT film

13 High Build Stencils

We then exposed the screen for 350 seconds, we are using a WPS Mini Exposure Unit (uses actinic tubes) with built in drying cabinet.  We are using a 200 micron film so you will need to adjust the timings of your exposure unit based on the bulb strength, type of bulb and thickness of the film.

14 High Build Stencils

Step 5

Washing out the Stencil
After the screen has completed the exposure time then we are ready to wash out the stencil.  The best way to do this is to prepare some hot water (hot bath temperature).  Use a sponge, dip it in the hot water and gently rub the stencil.  If you don’t use hot water you could spend 10 minutes or more trying to washout the stencil using the power hose by itself.

15 High Build Stencils

16 High Build Stencils
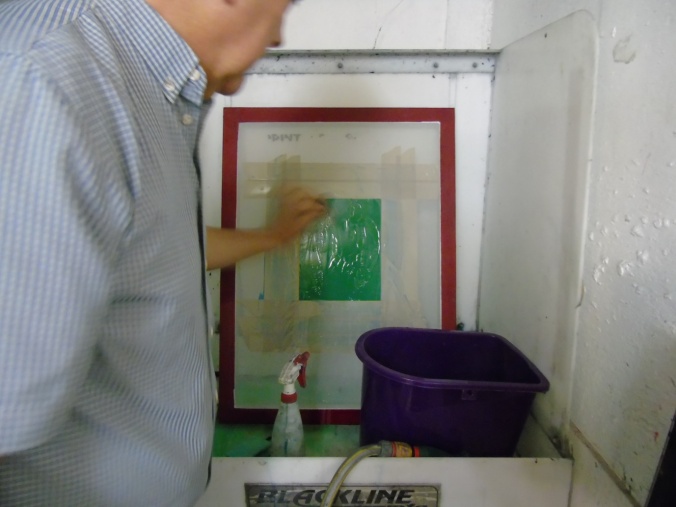
When the stencil is clear, use the power hose (or power washer on low pressure) to wash off any residue. Remove the blocking tape. Give the squeegee side a spray and start to remove the blocking tape, don’t be surprised to see some evidence of emulsion run off suggesting under exposure.  Don’t worry this is normal but make sure you give it a good enough wash squeegee side to make sure there is no emulsion residue in the Stencil.

17 High Build Stencils
The screen is now ready to go in the drying cabinet.  Don’t worry if you see any blisters around the edges of the film – this is because the light has not gone through the blocking tape.  If there is blistering across the film then the film is underexposed.

18 High Build Stencils

When the screen is completely dry we are now ready to apply blocking tape to uncovered areas of the screen.  As an option when you are laminate the PHAT film with emulsion you could cover up the rest of the screen – in this article we have used blocking tape.

19 High Build Stencils

Step 6

Printing
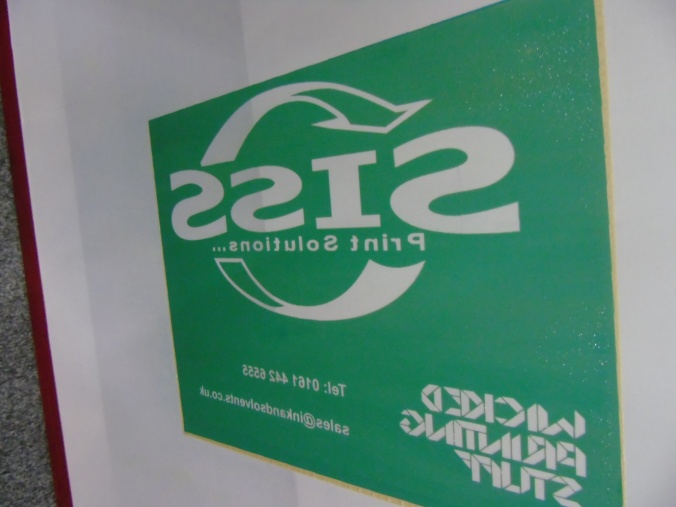
We are using WPS Premium Cotton White Ink and a 65 Blade (Red) Squeegee – softer the blade the better as we need to get plenty of ink to flood into the stencil.  We double flooded the stencil prior to printing.

20 High Build Stencils

To increase the opacity and depth of the print, we printed out the stencil – flash dried the ink and double flooded the stencil again and printed again. (AKA Print – Flash – Print)

21 High Build Stencils

Important – with a high build print, there is a lot of ink on the garment.  You will need to increase the curing time to ensure of the ink is completely cured.

22 High Build Stencils

What do you need to create a High Density Stencil?

We used the following equipment and consumables:-

WPS Degreaser

Epson 1500W using Blacquer High Density Black Ink

A4 Inkjet Positive Paper

Chromaline PHAT film 200 micron

Autosol 5000 Dual Cure Emulsion (laminate the film onto the mesh)]

Blocking tape

Aluminium Screen 23 x 31 32T Mesh

Squeegee Wood – Blade 75 Green

Squeegee Wood – Blade 65 Red

WPS Mini Exposure Unit with Integrated Drying Cabinet

WPS Premium Cotton White Plastisol Ink

KFIX hitak spray

WPS 6 colour 6 station carousel
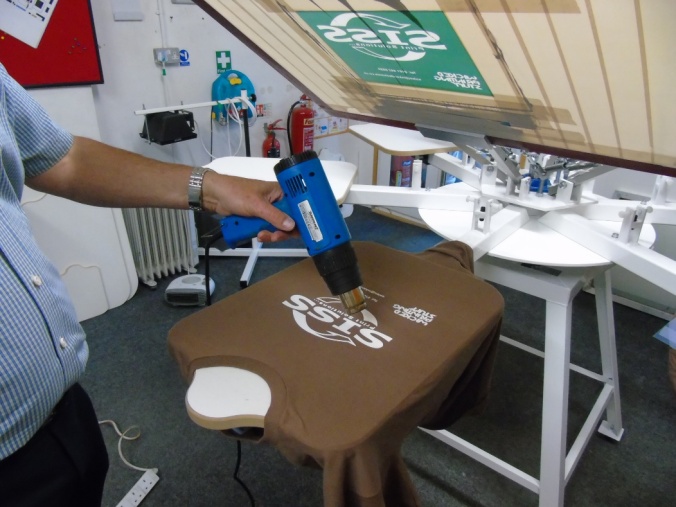
We used a Hot Air Gun to touch try the ink instead of a flash dryer and we used a Heat Press for curing – if printing a production run we would use a tunnel dryer.

Video tutorials

If you want tips on successful screen printing do checkout our You Tube channel https://www.youtube.com/user/wickedscreenprinter 

This channel is brought to you by Wicked Printing Stuff – part of Screen Ink and Solvents Ltd the largest independent distributor to the UK Screen Printing Industry. Wicked Printing Stuff offers screen printing advice, guidance, services and much more. We believe that anybody can screen print, its all about the practice and a little helping hand along the way. Our aim is to make videos and write guides that help to take the complexity out of screen printing. For some of our How To Screen Print Guides and more detail about our services go to http://www.wickedprintingstuff.com for more, check out our blog for hints and tips https://wickedprintingstuff.wordpress.com/

BBC – GCSE Bitesize: Printing – Design and Techology

Are you studying Design and Technology? This is a useful link that explains some of the printing techniques.

BBC – GCSE Bitesize: Printing.

Fabrics are printed by block or screen printing. In screen printing a pattern is printed onto fabric through a stencil held in place by a screen. Each screen prints one part of the design in one colour. After printing the dyestuff must be fixed using steam or dry heat.

You may also find our screen printing videos on YouTube helpful.

All about curing technology

Curing Technology

Top Tip to Save Money

Low volume production can double up two process on one piece of equipment. A flash dryer or a hand curer can be used for drying between colours AND curing.

It can be difficult deciding what equipment to buy for flash drying and curing your prints. We know that your budget can also dictate what type of curing equipment you have. So to help you decide, we put together a quick guide to what works and what doesn’t when flash drying and curing your prints.

Starting at the top is the lowest cost option right through to the higher end of heat presses and tunnel dryers. Although the entry level range for these machines can be extremely cost effective.

Curing Technologies

What is the Serigraphy?

What is the difference between Serigraphy and Screen Printing?

Actually there isn’t any really, the process is identical, you might almost call it a snob term. Exactly like printing on t-shirts it involves screens and inks however it is often used to refer to fine art rather than garments. Sometimes the results can be limited edition runs, hand printed by the artists and then the design is destroyed. This is one I found on the internet searching on serigraph limited editions.

https://m1.behance.net/rendition/modules/87274333/hd/4b89504589284a64cb2e173bd680a190.png

Blackline Dip Tanks

The large dip tank is ideal for quickly and easily remove ink and emulsion when used in conjunction with the new one-step cleaners on the market.Blackline’s large dip tank is built of 3/8″ welded polypropylene and holds up to six standard size screens. It ships UPS and comes standard with a screen hold down and a lid to minimize solvent evaporation when the system is not in use. Custom sizes available.Measures 36″ x 10″ x 29″Screen Dip Tank Features 3/8-inch welded polypropylene construction Six standard-size-screen capacity Comes with screen hold down, support rings and lid Spigot for easy draining

via Blackline Dip Tank Large.